This is a simple tutorial on how to connect Jamf Pro to Jamf’s AD CS Connector application. AD CS Connector allows organizations to connect Jamf Pro to their Active Directory environment without exposing a Domain Controller to the internet. AD CS Connector works as a web proxy using IIS and passes certificate requests to a Certificate Authority.
What is AD CS Connector?
- AD CS Connector = Active Directory Certificate Services Connector
- AD CS Connector is a web application which performs the role of a web proxy and allows organizations to issue certificates automatically through Jamf Pro.
- AD CS Connector allows organizations to safely connect their Active Directory environment to Jamf Pro without exposing it directly to the internet or other insecure networks.
How is AD CS Connector used?
- A Certificate profile is created and distributed to a computer via MDM. This profile includes information on what Certificate Template the certificate should use and how to create the Certificate Signing Request (CSR).
- AD CS Connector only accepts communication from Jamf Pro that is encrypted by a Server Certificate generated during installation, likewise Jamf Pro only accepts communication from AD CS Connector that is encrypted by a Client Certificate generated during installation.
- Organizations can use their own client/server certificates, however they have to know how to install and configure them correctly.
- AD CS Connector allows administrators to specify a certificate template which exists on a CA in the domain that the AD CS Connector host is joined with.
- The computer account or service account used by AD CS Connector must have at least read and enroll privileges on the specified template, either directly or through group membership.
- AD CS Connector can be used with multiple load balanced CA’s, however they must be replicated and each must contain the template specified in the configuration profile.
- If there are multiple CA’s behind a load balancer and one does not contain the template specified in the configuration profile, the request will fail and the profile will not install.
- During the installation of the profile, a Certificate Signing Request is sent by Jamf Pro to AD CS Connector.
- AD CS Connector then passes that request to the specified CA on the domain which contains the Certificate Template specified in the profile.
- The certificate is generated and signed by the CA, then sent back through AD CS Connector to Jamf Pro, then to the computer which is in scope of the Certificate profile.
What does the deploy.ps1 script do?
Let’s start with the script command line options:
Usage: .\deploy.ps1 [-param value]
-help    	:Display this message
-archivePath    :Path of the archive to deploy (Default: $archivePath)
-installPath    :Path to install site (Default: $installPath)
-hostPath       :Host path of new site - i.e. localhost/hostPath (Default: empty)
-bindPort       :Port to bind site to (Default: $bindPort)
-installIIS     :Install IIS and ASP.NET features (Default: $installIIS)
-cleanInstall   :Run as clean install (Default: $cleanInstall)
-appPool        :Name of the IIS Application Pool (Default: $appPool)
-siteName       :Name of the IIS Site (Default: $siteName)
-configureHttps :Should configure HTTPS with self-signed certificate (Default: $configureHttps)
-fqdn           :FQDN for self-signed certificate
-jamfProDn      :Domain name of Jamf Pro instance that will be communicating with this service
Note: If the cleanInstall command line option is used, the script will overwrite all parts of an existing installation.
Next up, the default options of the script. These have changed between version 1.0.0 and version 1.1.0.
Version 1.0.0:
$archivePath = ".\adcs.zip"
$installPath = "C:\inetpub\wwwroot\adcsproxy"
$hostPath = ""
$bindPort = 443
$installIIS = $true
$cleanInstall = $true
$appPool = "AdcsProxyPool"
$siteName = "AdcsProxy"
$configureHttps = $true
Version 1.1.0:
$archivePath = ".\adcs.zip"
$installPath = "C:\inetpub\wwwroot\adcsproxy"
$hostPath = ""
$bindPort = 443
$installIIS = $false
$cleanInstall = $false
$appPool = "AdcsProxyPool"
$siteName = "AdcsProxy"
$configureHttps = $false
So, what does the script do? It’s actually not that complicated of an installation script. You can review the script before running it and edit it as well. Here’s the gist of it:
- The script begins by installing the IIS server role and the WebAdministration module.
- It then creates the AD CS Connector website directory ($installPath) and unzips the installation files there.
- Next, it creates the IIS application pool and site, then links them.
- Next, it creates the IIS user. Default username is $siteName+”AccessUser”
- After that, it creates a firewall rule to allow inbound connections on the port defined with $bindPort, generates a self-signed certificate for itself and a certificate for your Jamf Pro instance, and installs the web certificate while binding the AD CS Connector site to the $bindPort port.
Prerequisites
- A Windows server joined to an Active Directory Domain which can be reached by your Jamf Pro server.
- A Jamf Pro subscription and Jamf Pro server.
Installing AD CS Connector
- Connect to your Windows server.
- Download AD CS Connector from https://account.jamf.com/products/other/ad-cs-connector on the Windows server.
- Extract the downloaded file.
- If this is your first time installing AD CS Connector and you downloaded version 1.1.0, edit the first section of the deploy.ps1 script to use these values rather than the default values.
- You can also specify these with command line options.
- ONLY CHANGE THESE VALUES FOR NEW INSTALLATIONS. This is not necessary for upgrading AD CS Connector and will actually break existing deployments.
- This is not necessary for version 1.0.0 (and hopefully future versions).
param (
    [switch]$help = $false,
    [string]$archivePath = ".\adcs.zip",
    [string]$installPath = "C:\inetpub\wwwroot\adcsproxy",
    [string]$hostPath = "",
    [int]$bindPort = 443,
    [switch]$installIIS = $true,
    [switch]$cleanInstall = $false,
    [string]$appPool = "AdcsProxyPool",
    [string]$siteName = "AdcsProxy",
    [switch]$configureHttps = $true,
    [string]$fqdn,
    [string]$jamfProDn
)- Open Powershell as administrator.
- Run this command in Powershell to allow unsigned scripts to be executed:
Set-ExecutionPolicy -Scope Process -ExecutionPolicy Bypass- If you don’t run this, you won’t be able to install AD CS Connector because Windows Server does not allow unsigned scripts to run by default.
- Run this command in Powershell to change to the correct directory:
cd "C:\Users\$YOURUSER\Downloads\adcs-connector-$VERSION\ADCS Connector"- $YOURUSER is your username, $VERSION is your version number – 1.0.0 or 1.1.0 currently.
- Run this command in Powershell to install AD CS Connector:
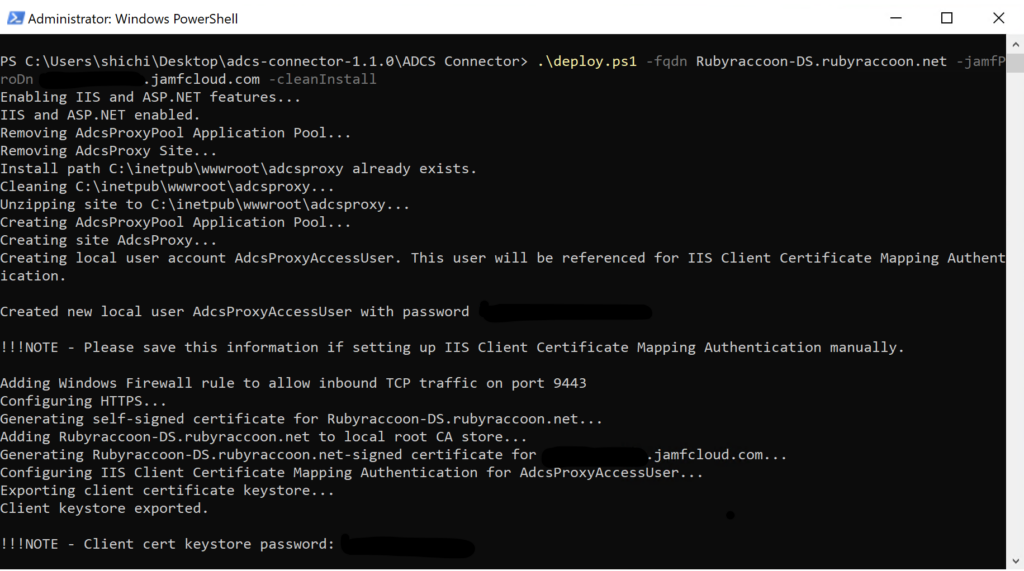
.\deploy.ps1 -fqdn my.adcs-proxy.url -jamfProDn my.domain.name -cleanInstall- Ignore that my screenshot says port 9443, that’s required by my test environment. You can change the port that AD CS Connector runs on so long as you know what you’re doing.
- TAKE NOTE of the Client cert keystore password. Mine is redacted here.
- Log into your Jamf Pro server from the Windows Server now hosting AD CS Connector.
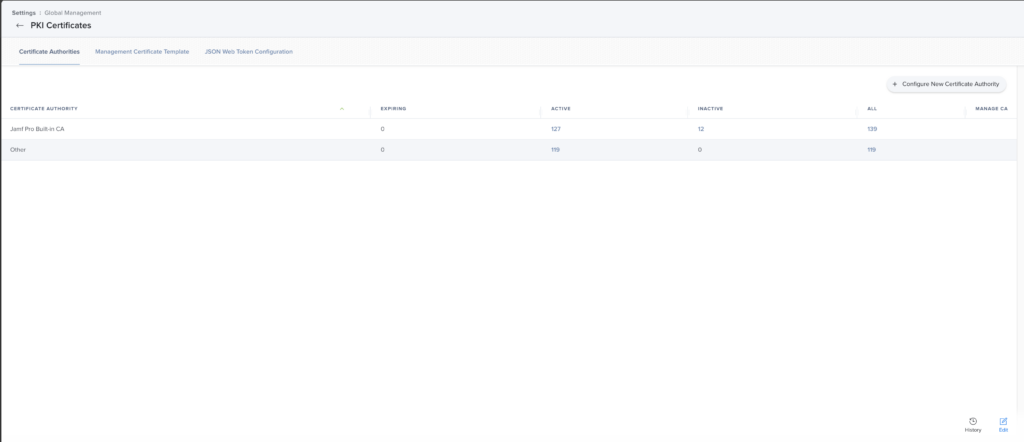
- Navigate to Settings → Global Management → PKI Certificates → Configure New Certificate Authority.
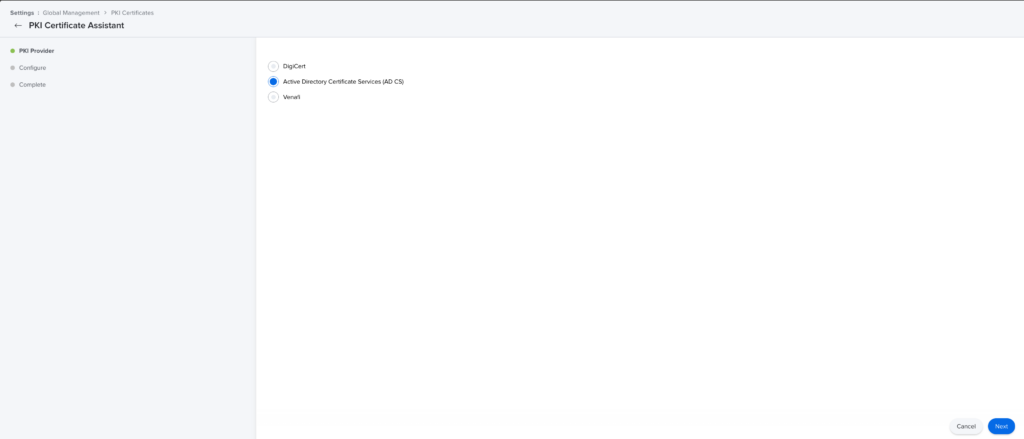
- Select Active Directory Certificate Services (AD CS).
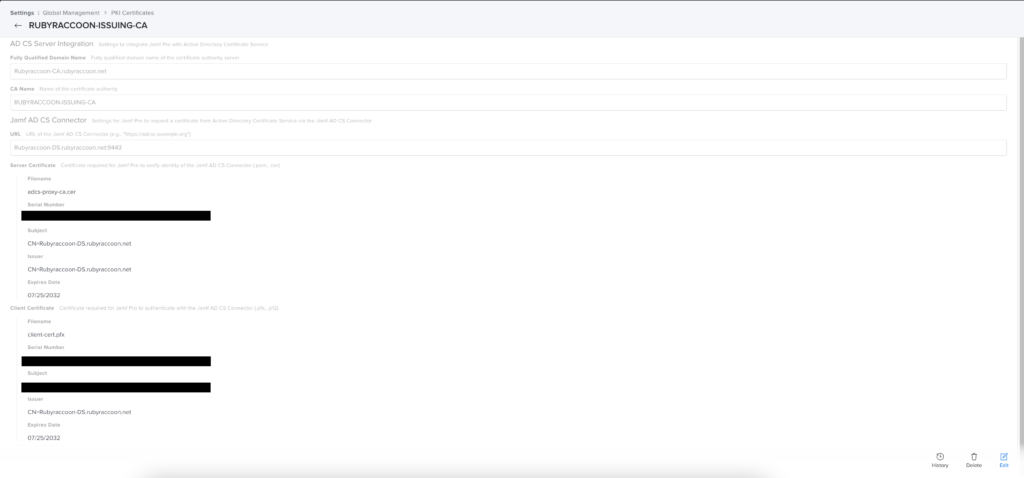
- Enter the Fully Qualified Domain Name of the CA Server.
- This is the certification authority server.
- NOT the AD CS Connector server
- Enter the CA Name.
- Enter the URL of the AD CS Connector Server.
- Click Upload for Server Certificate, then navigate to the AD CS Connector folder to select adcs-proxy-ca.cer.
- Click Upload for Client Certificate, then navigate to the AD CS Connector folder to select client-cert.pfx.
- Note: You can replace the certificates and use your own, however there’s generally no need to. This also requires extra configuration of the AD CS Connector server and the knowledge to change the certificates used and expected by IIS.
- Enter the Client cert keystore password that you took note of earlier.
- Click Save.
Congratulations! You now have set up AD CS Connector!